
See the clap count at the bottom left ↙? That’s Claps. In this tutorial, we will understand Server Actions and build a similar component for your app together. Feel free to jump to Project Setup if you want to go ahead with the implementation.
You can also use our open source component @upstash/claps. Easy to setup, nothing to maintain and completely serverless.
Understanding Server Actions
Server Actions are async functions that are executed on the server. They allow you to define server-side functions directly in your components. They can be invoked from the client side without explicitly defining API routes or handling network requests manually.
Server Actions can be used in both Client Components and Server Components. In the following sections, we will design our Claps component firstly as a Client Component and then as a Server Component, to see how Server Actions work in each case and compare the two approaches. Finally, we will implement one of these designs.
'use server' Directive
‘use server’ directive is used to mark Server Actions. Server Actions are commonly confused with React Server Components. Checkout our blog post Working with React Server Components if you are not familiar with them to better understand the distinction.
Working with Client Components
Now let’s design our Claps component as a Client Component.
- Client Components can only import actions from files that use the
'use server'directive:
"use server";
...
export async function getClapCount(slug: string) {
  ...
}

export async function clap(slug: string) {
  ...
}- Now
getClapCountcan be used to retrieve the number of claps andclapcan be used to increase it."use client"declares a boundary between Server and Client Component modules, making this a Client Component.
"use client";

import { useState, useEffect } from "react";
import { getClapCount, clap } from "./actions";

export default function Claps({ slug }: { slug: string }) {
  const [claps, setClaps] = useState<number>(0);

  useEffect(() => { // Get the number of claps
    getClapCount(slug).then(setClaps);
  }, [slug]);

  return (
    <div>
      <button
        onClick={() => { // Increment the number of claps
          clap(slug).then((clapped) => {
            if (clapped) {
              setClaps((claps) => claps + 1);
            }
          });
        }}
      >
	      <span className="text-xl">👏</span>
        <span className="text-md">{claps}</span>
      </button>
    </div>
  );
}
Behind the Scenes
While Claps is being built, bundler will create references to getClapCount and clap Server Actions in the bundle. When the useEffect runs or button is clicked, React will send a request to the server to execute the corresponding function using these references.
Working with Server Components
Now let’s design our Claps component as a Server Component.
- Server Actions be defined in Server Components with the
‘use server’directive. Next.js uses Server Components by default, making this a Server Component.
...
import Button from "./button";
...
export default async function Claps({ slug }: { slug: string }) {
  const claps = (await redis.get<number>(`claps:${slug}`)) || 0; // Get the number of claps

  async function clap() {
    "use server";
    ...
  }

  return <Button claps={claps} onClick={clap} />;
}- Event handlers such as
onClickcannot be used in Server Components. Therefore we need to separate theButtonas a Client Component and pass theclapServer Action down to it.
"use client";

export default function Button({ claps, onClick }) {
  return (
    <div>
      <button
        onClick={() => onClick()} {/* Increment the number of claps */}
      >
        <span className="text-xl">👏</span>
        <span className="text-md">{claps}</span>
      </button>
    </div>
  );
}
Behind the Scenes
While Claps is being rendered, React will create a reference to clap Server Action and pass it to the Button. When the button is clicked, React will send a request to the server to execute the clap using this reference.
Choosing an Approach
As shown in the design with Client Components, you can also use Server Actions to fetch data. However, this is discouraged since actions only use the POST method. For this case, fetching the data in React Server Components and passing it down as props seems to be a better design. Moreover, this approach provides a unified simple view of the component and displays the data on first render instead of using useEffect.
Server Actions in Next.js and Security
Server Actions are basically publicly accessible HTTP endpoints that only use the POST method. Even if they are not imported elsewhere in your code they are public, you should treat them as such and secure them. For more information on Server Actions Security you can check the Next.js documentation.
- Authentication and Authorization: You should always check if the user is allowed to invoke this action.
- Validating Arguments: Keep in mind that TypeScript annotations you provide to the function are not not enforced, you should manually validate the types of arguments or use a tool like
zod. - Closures: When you define a Server Action inside a component, a closure is created so that the action has access to outer function’s scope. Variables in the outer function’s scope may contain sensitive data, so Next.js encrypts them with a private key that is created for each action and for each build.
Next.js recommends using React taint APIs to prevent specific data from being exposed to the client.
Next.js 15 RC 2 also introduced some enhancements to improve the security of Server Actions:
- Dead Code Elimination: IDs of unused Server Actions won’t be exposed.
- Secure Action IDs: Unguessable IDs are created periodically between builds.
Project Setup
We will use a Blog template from Vercel:
pnpm create next-app --example https://github.com/vercel/examples/tree/main/solutions/blog blogYou can run the example locally and see what it looks like:
cd blog
pnpm dev
Let’s install @upstash/redis:
pnpm add @upstash/redisEnvironment Setup
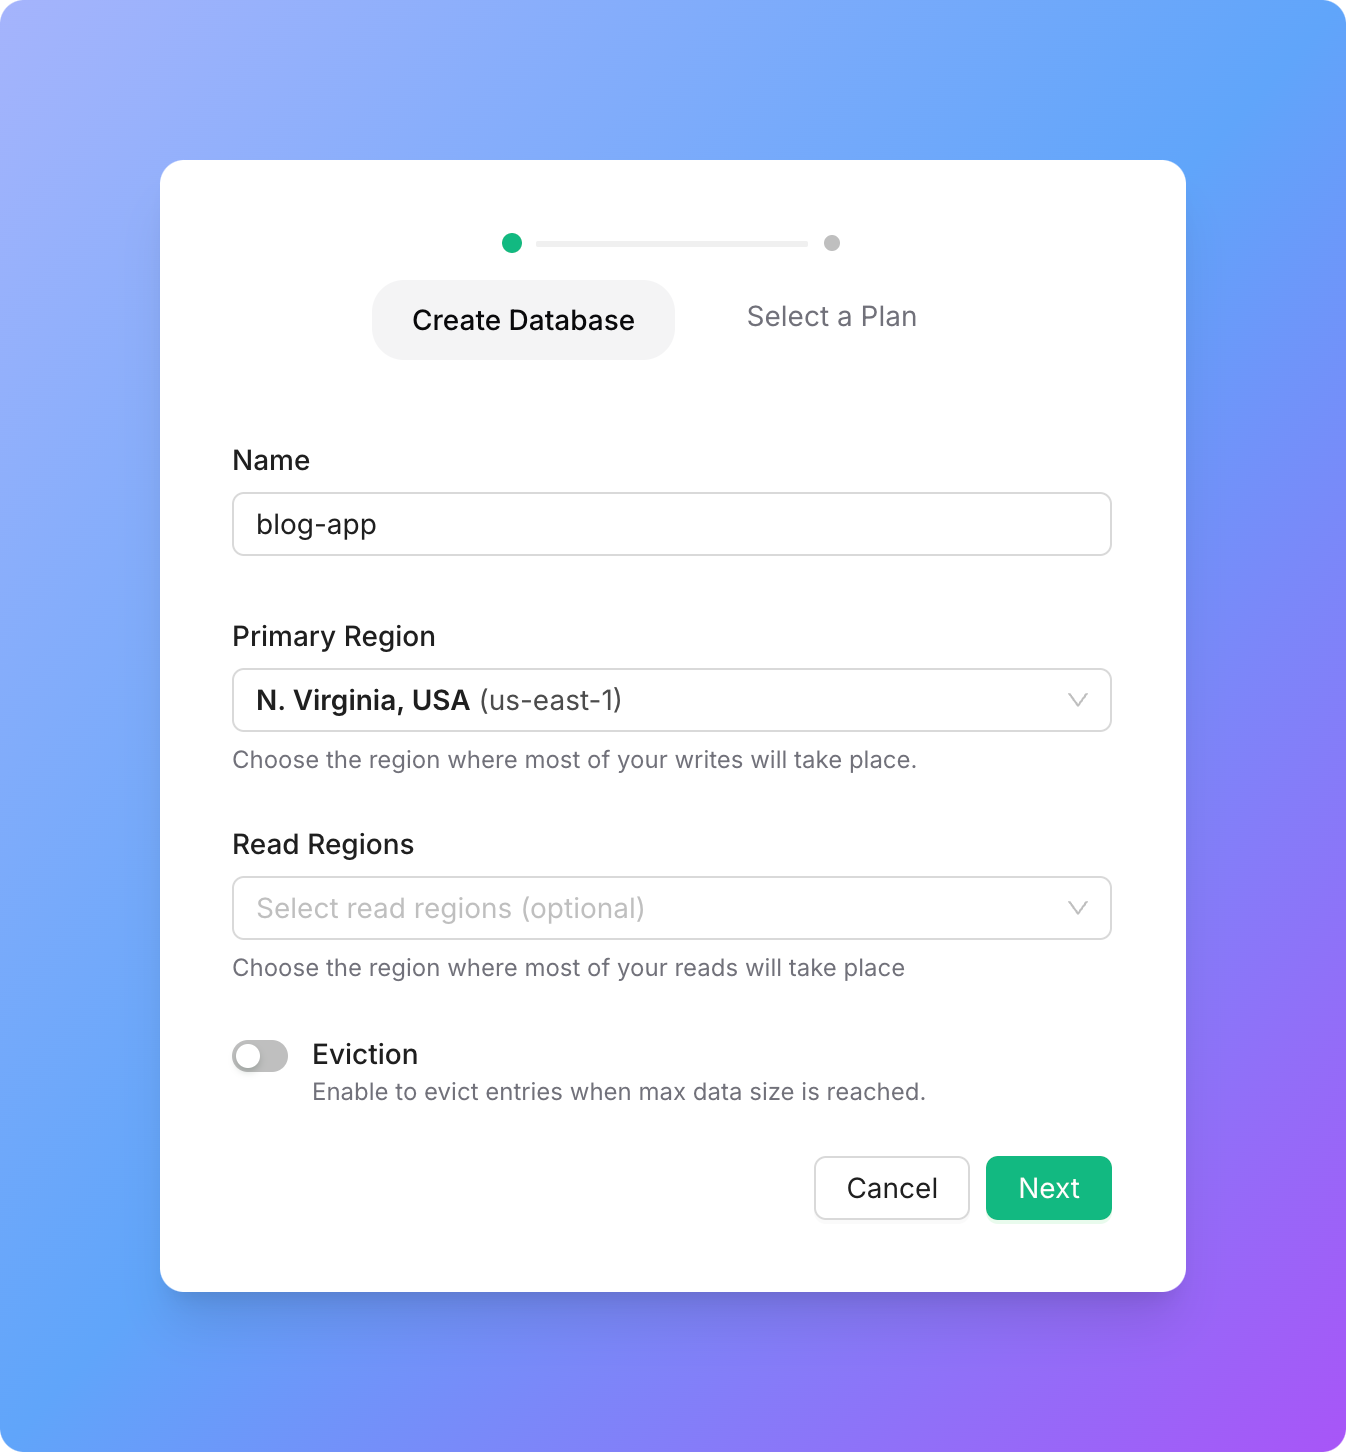
- Go to Upstash Console → Redis and create a new Database:
- Scroll down to REST API section, switch to .env tab and copy the environment variables for the next step:
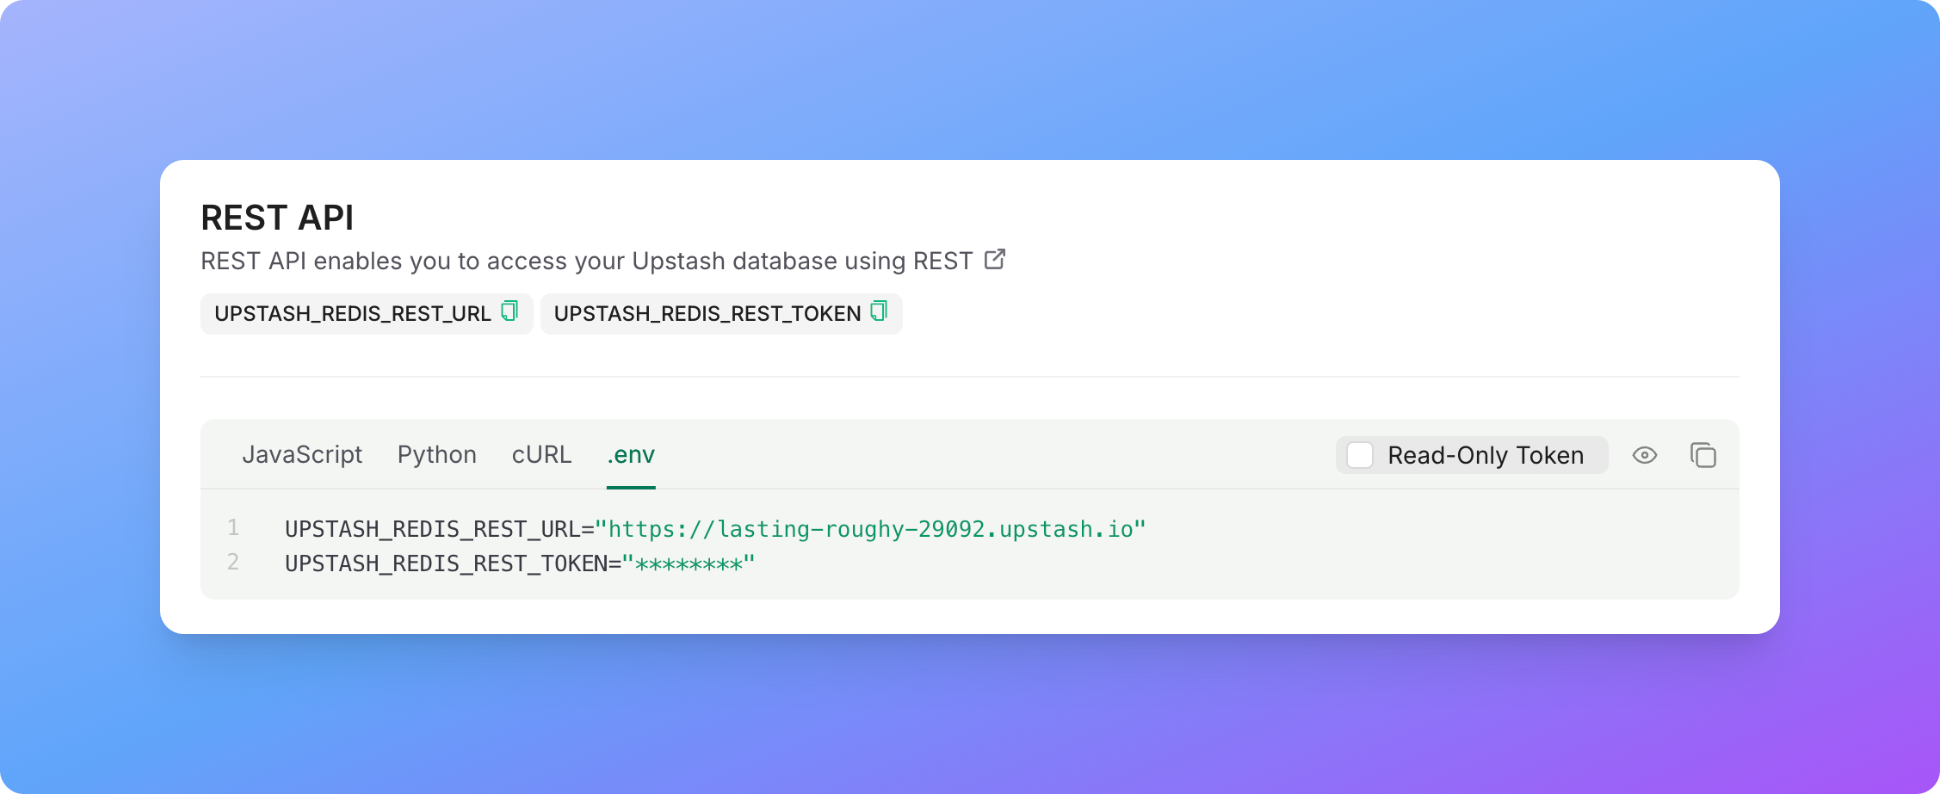
- Create a
.envfile and paste your environment variables:
UPSTASH_REDIS_REST_URL=<YOUR_URL>
UPSTASH_REDIS_REST_TOKEN=<YOUR_TOKEN>
Implementation
Create Claps Component with a Server Action
Create /app/components/claps.tsx :
We are using revalidatePath at the end of the clap Server Action to purge the cached data so that we can see the updated number of claps.
import { Redis } from "@upstash/redis";
import { headers } from "next/headers";
import { revalidatePath } from "next/cache";
import Button from "./button";

const redis = Redis.fromEnv();

export default async function Claps({ slug }: { slug: string }) {
  // Get the number of claps
  const claps = (await redis.get<number>(`claps:${slug}`)) || 0;

  async function clap() {
    "use server";

    // Get the IP address of the user
    const header = headers();
    const ip = (header.get("x-forwarded-for") ?? "127.0.0.1").split(",")[0];
    // Hash the IP address
    const buf = await crypto.subtle.digest(
      "SHA-256",
      new TextEncoder().encode(ip)
    );
    const hash = Array.from(new Uint8Array(buf))
      .map((b) => b.toString(16).padStart(2, "0"))
      .join("");
    // Deduplicate claps
    const newClap = await redis.set(`deduplicate:claps:${hash}:${slug}`, true, {
      nx: true, // Only set the key if it doesn't exist
      ex: 24 * 60 * 60, // Expire the key after 24 hours
    });
    if (newClap) {
      await redis.incr(`claps:${slug}`); // Increment the clap count
      revalidatePath(`/blog/${slug}`); // Revalidate the page
    }
  }

  return <Button claps={claps} onClick={clap} />;
}
Create the Button Component
Create /app/components/button.tsx :
We are separating the Button as a Client Component here so that we can use onClick with the reference of clap Server Action passed down from Claps Server Component.
"use client";

export default function Button({ claps, onClick }) {
  return (
    <div className="fixed left-4 bottom-4 rounded-full p-[2px] shadow-[0_4px_12px_rgba(0,0,0,0.25)]">
      <button
        className="flex items-center rounded-full gap-2 py-2 px-4 hover:bg-neutral-100"
        onClick={() => onClick()}
      >
        <span className="text-xl">👏</span>
        <span className="text-md">{claps}</span>
      </button>
    </div>
  );
}
Import and Display Claps Component
Edit /app/blog/[slug]/page.tsx:
...
import Claps from 'app/components/claps'
...
<article className="prose">
<CustomMDX source={post.content} />
</article>
<Claps slug={post.slug} />
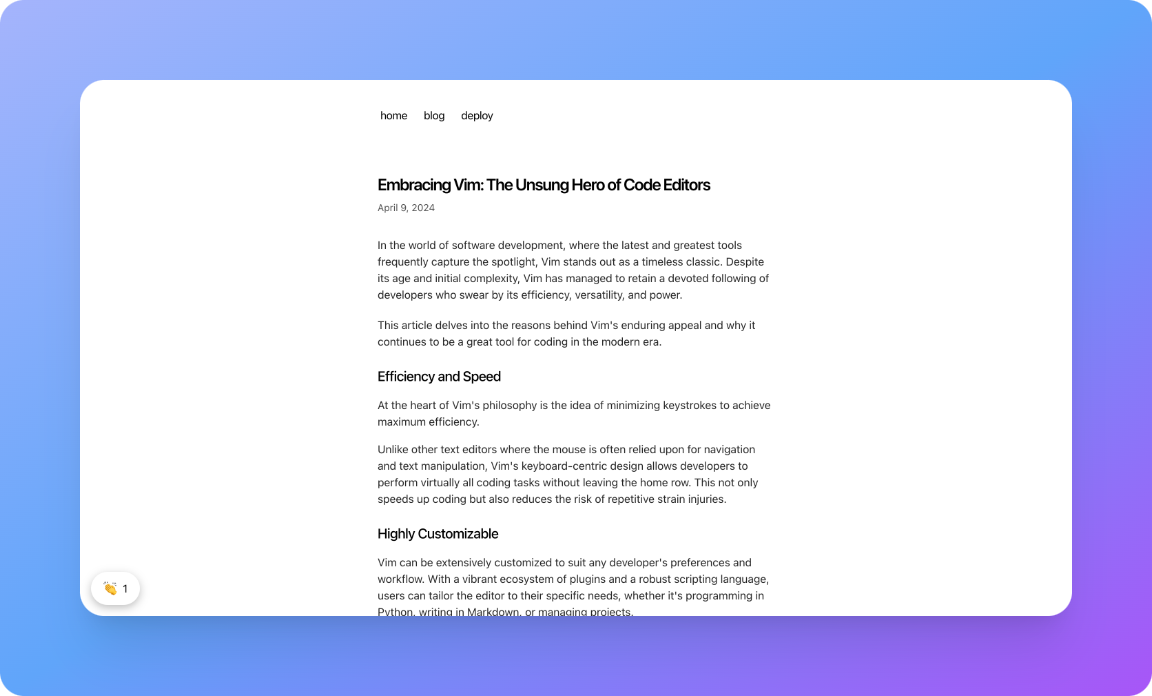
...Visit http://localhost:3000/blog/vim to see the claps in action:
Deploy
You can deploy your site to Vercel with the following command:
vercelFinal Words
Using Server Actions removed the necessity of a separate API and provided a simple view of the component and its logic. I hope this guide helps you further simplify your codebase and improve your development experience.